AWS IAM Identity Center
Create the SAML Application
To get started navigate to the Applications tab of the AWS IAM Identity Center console.
Click Add application, then select the I have an application I want to set up option.
For Application Type, click the SAML 2.0 option and then click Next.
Configure the SAML Application
Under Display name, give your application a suitable name.
Similarly, provide a suitable description under Description.
Under IAM Identity Center metadata, copy the IAM Identity Center SAML metadata file and paste it somewhere handy. We will be using this later.
Scroll down to the Application properties section.
Set the Application start URL field to be your app_url parameter in the Terraform deployment.
Scroll down to the Application metadata section.
Set the Application ACS URL field to be first_time_setup_config.saml_sso_acs_url from the deployment outputs.
Set the Application SAML audience field to be first_time_setup_config.saml_sso_entity_id from the deployment outputs.
Click Submit
Configure the SAML Attributes
- We will need to set up a couple of attribute mappings. Specifically: email, firstname and lastname
Click the Actions menu then select the Edit attribute mappings option.
There should be one entry already for “Subject” for this pre-existing entry set the field Maps to this string value or user attribute in IAM Identity Center to ${user:email}
Add a new attribute mapping.
1. Email Mapping
- For User attribute in the application, enter:
http://schemas.xmlsoap.org/ws/2005/05/identity/claims/emailaddress - For Maps to this string value or user attribute in IAM Identity Center, enter:
${user:email} - For Format select
basic
2. Given Name Mapping
- For User attribute in the application, enter:
http://schemas.xmlsoap.org/ws/2005/05/identity/claims/givenname - For Maps to this string value or user attribute in IAM Identity Center, enter:
${user:givenName} - For Format select
basic
3. Family Name Mapping
- For User attribute in the application, enter:
http://schemas.xmlsoap.org/ws/2005/05/identity/claims/familyname - For Maps to this string value or user attribute in IAM Identity Center, enter:
${user:familyName} - For Format select
basic
It should look like this:
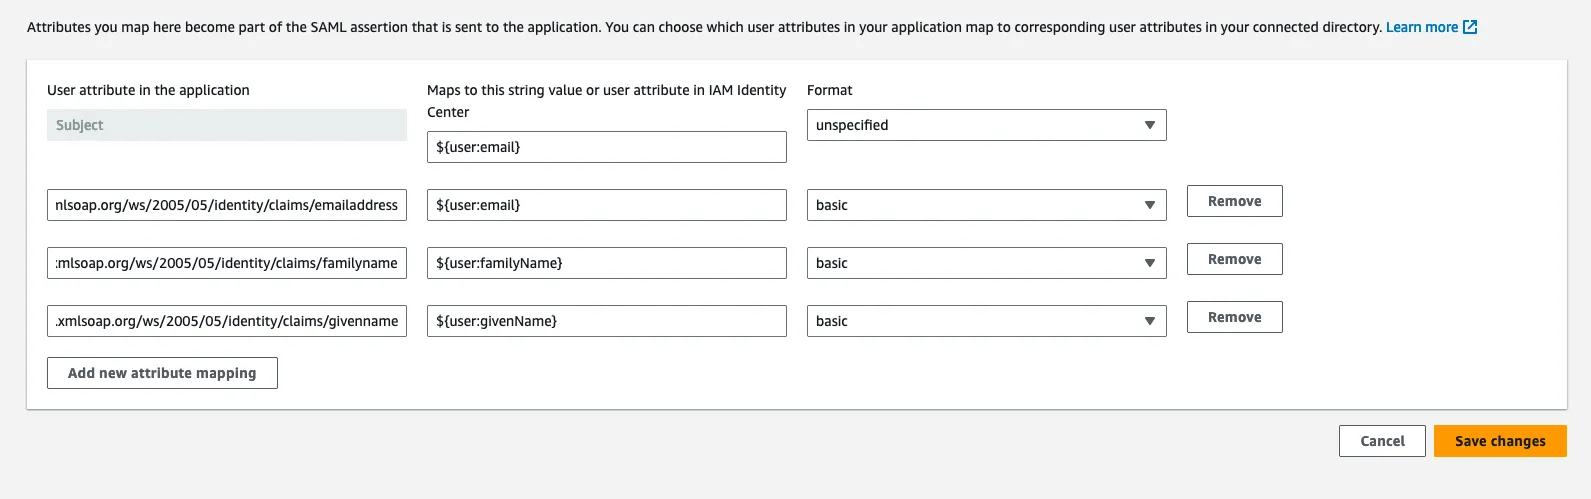
Click Save Changes
Setup the SAML SSO provider in your deployment
Copy the SAML metadata URL from AWS IAM Identity Center.
Add the following variables to your Terraform deployment
saml_provider_name = "AWS"saml_metadata_is_file = falsesaml_metadata_source = <The SAML metadata URL>Now, run a deployment:
terraform apply