AWS RDS
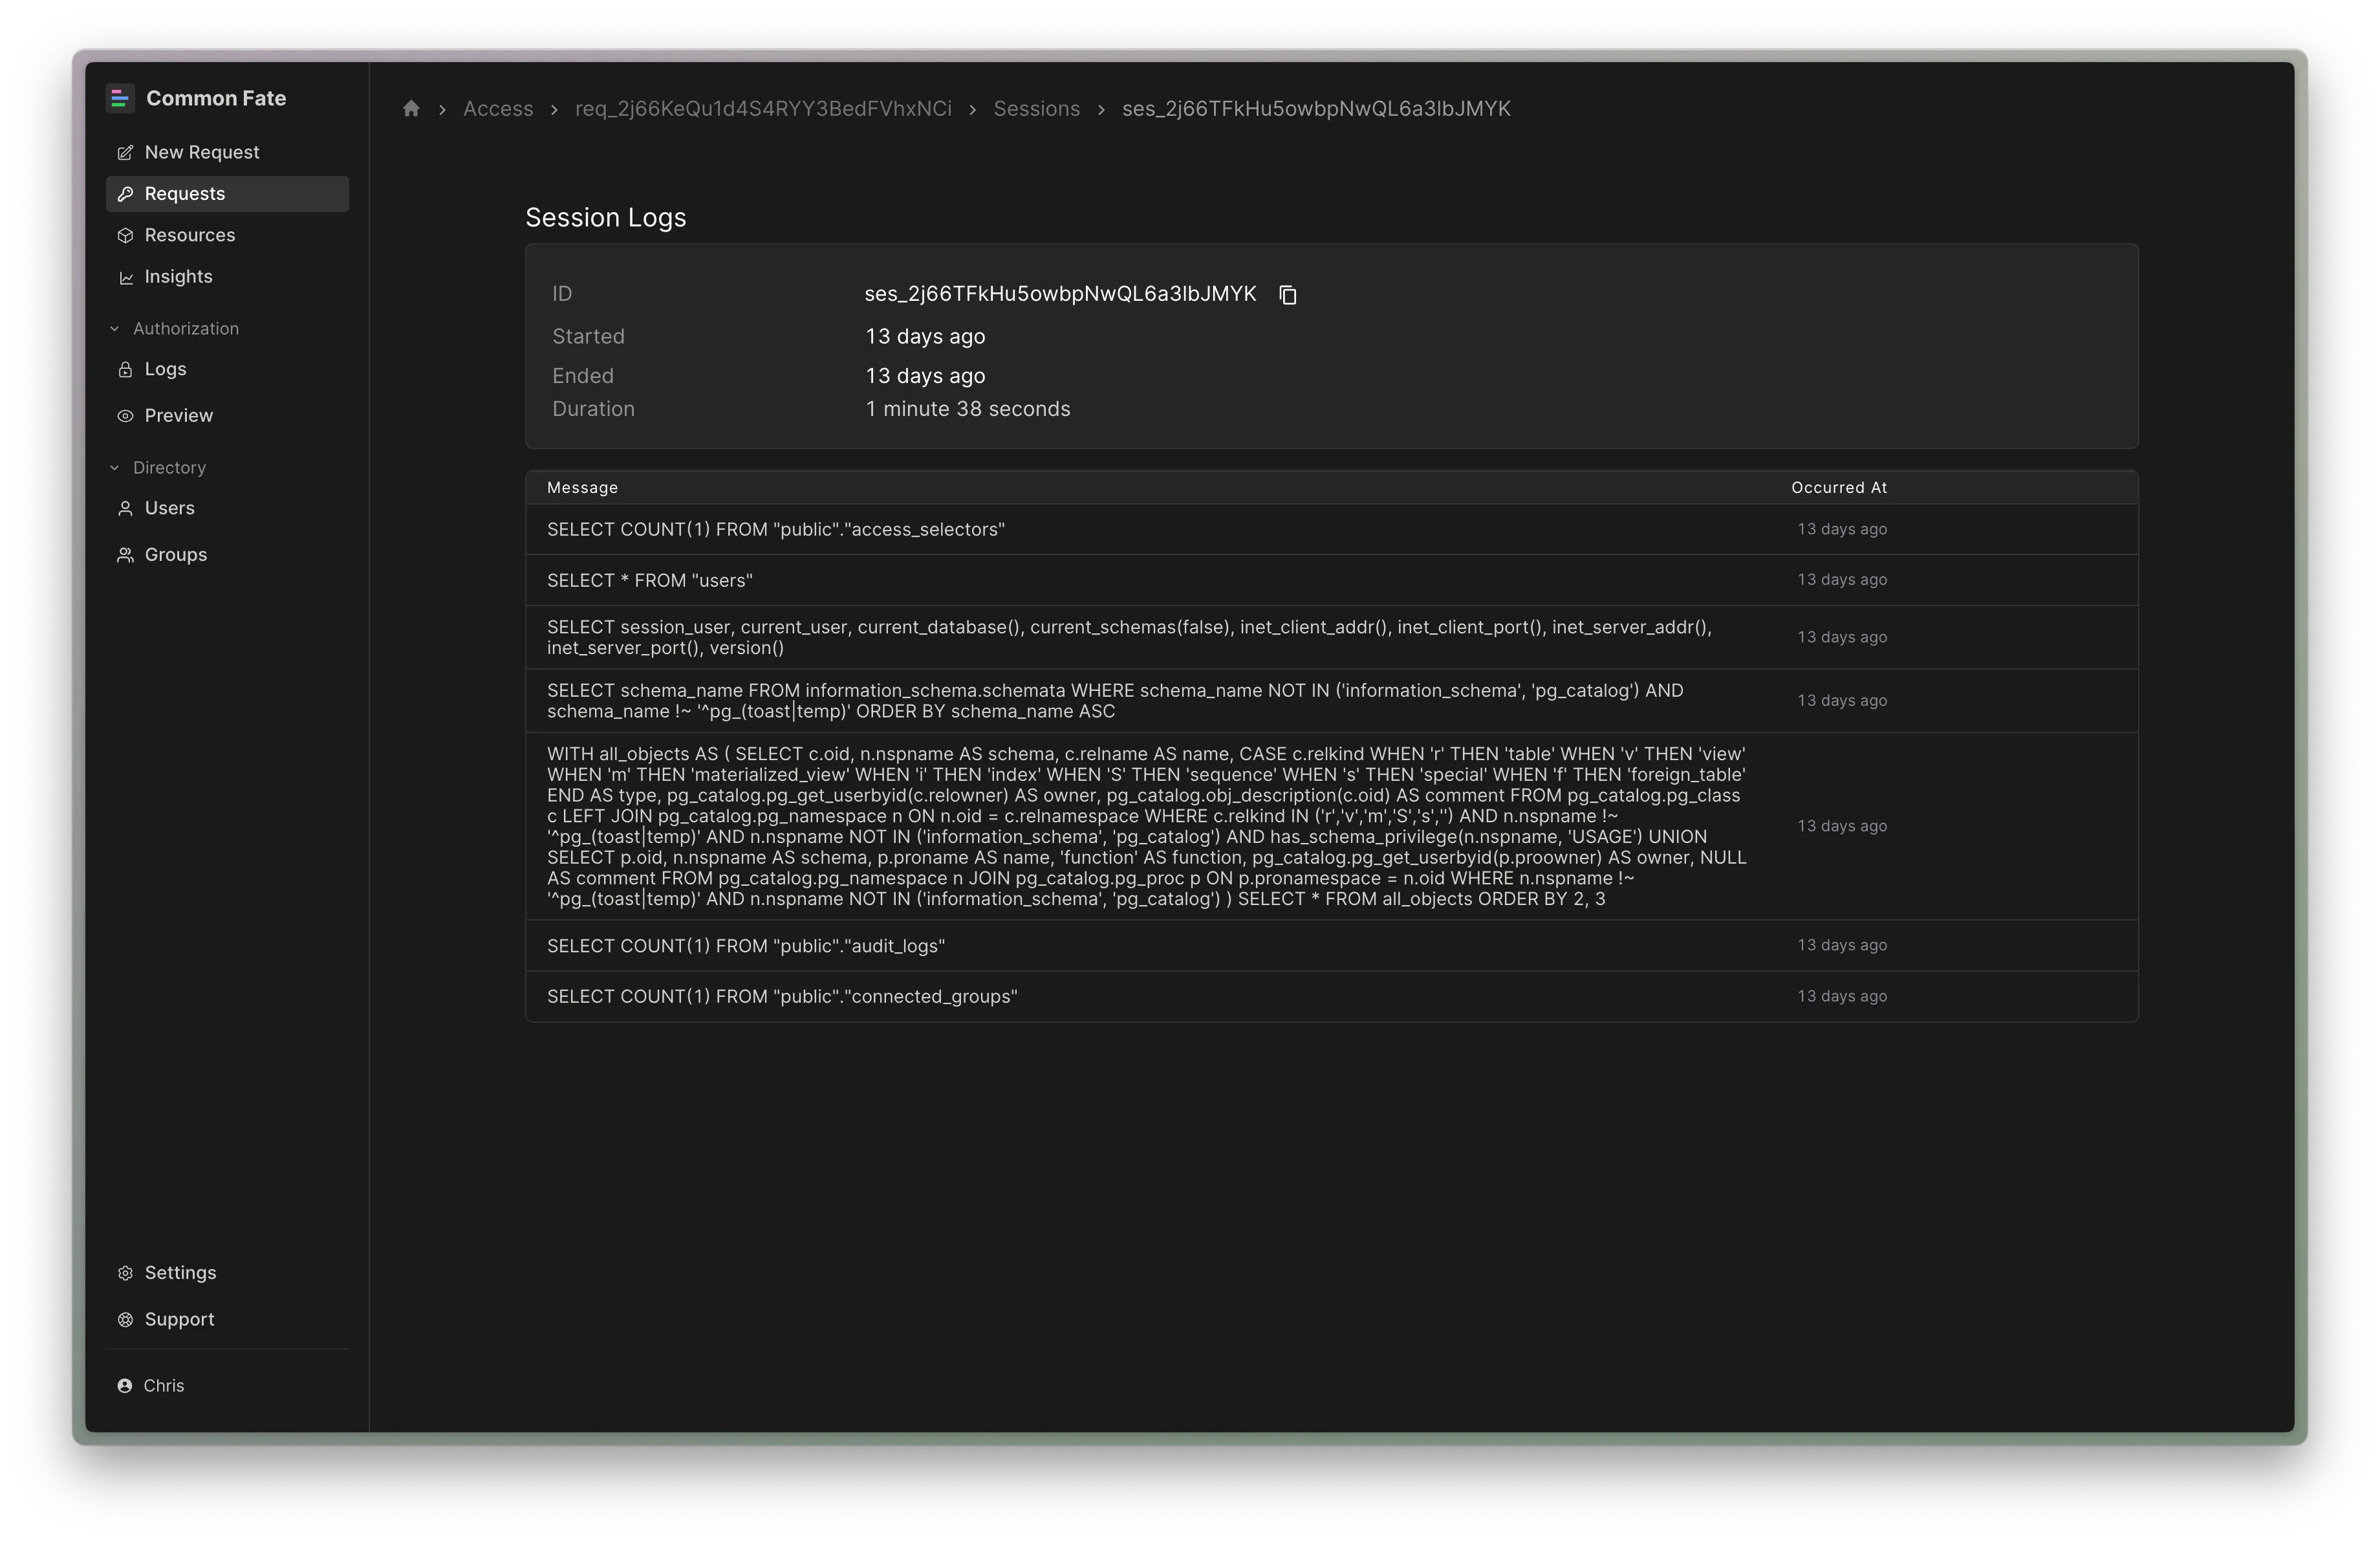
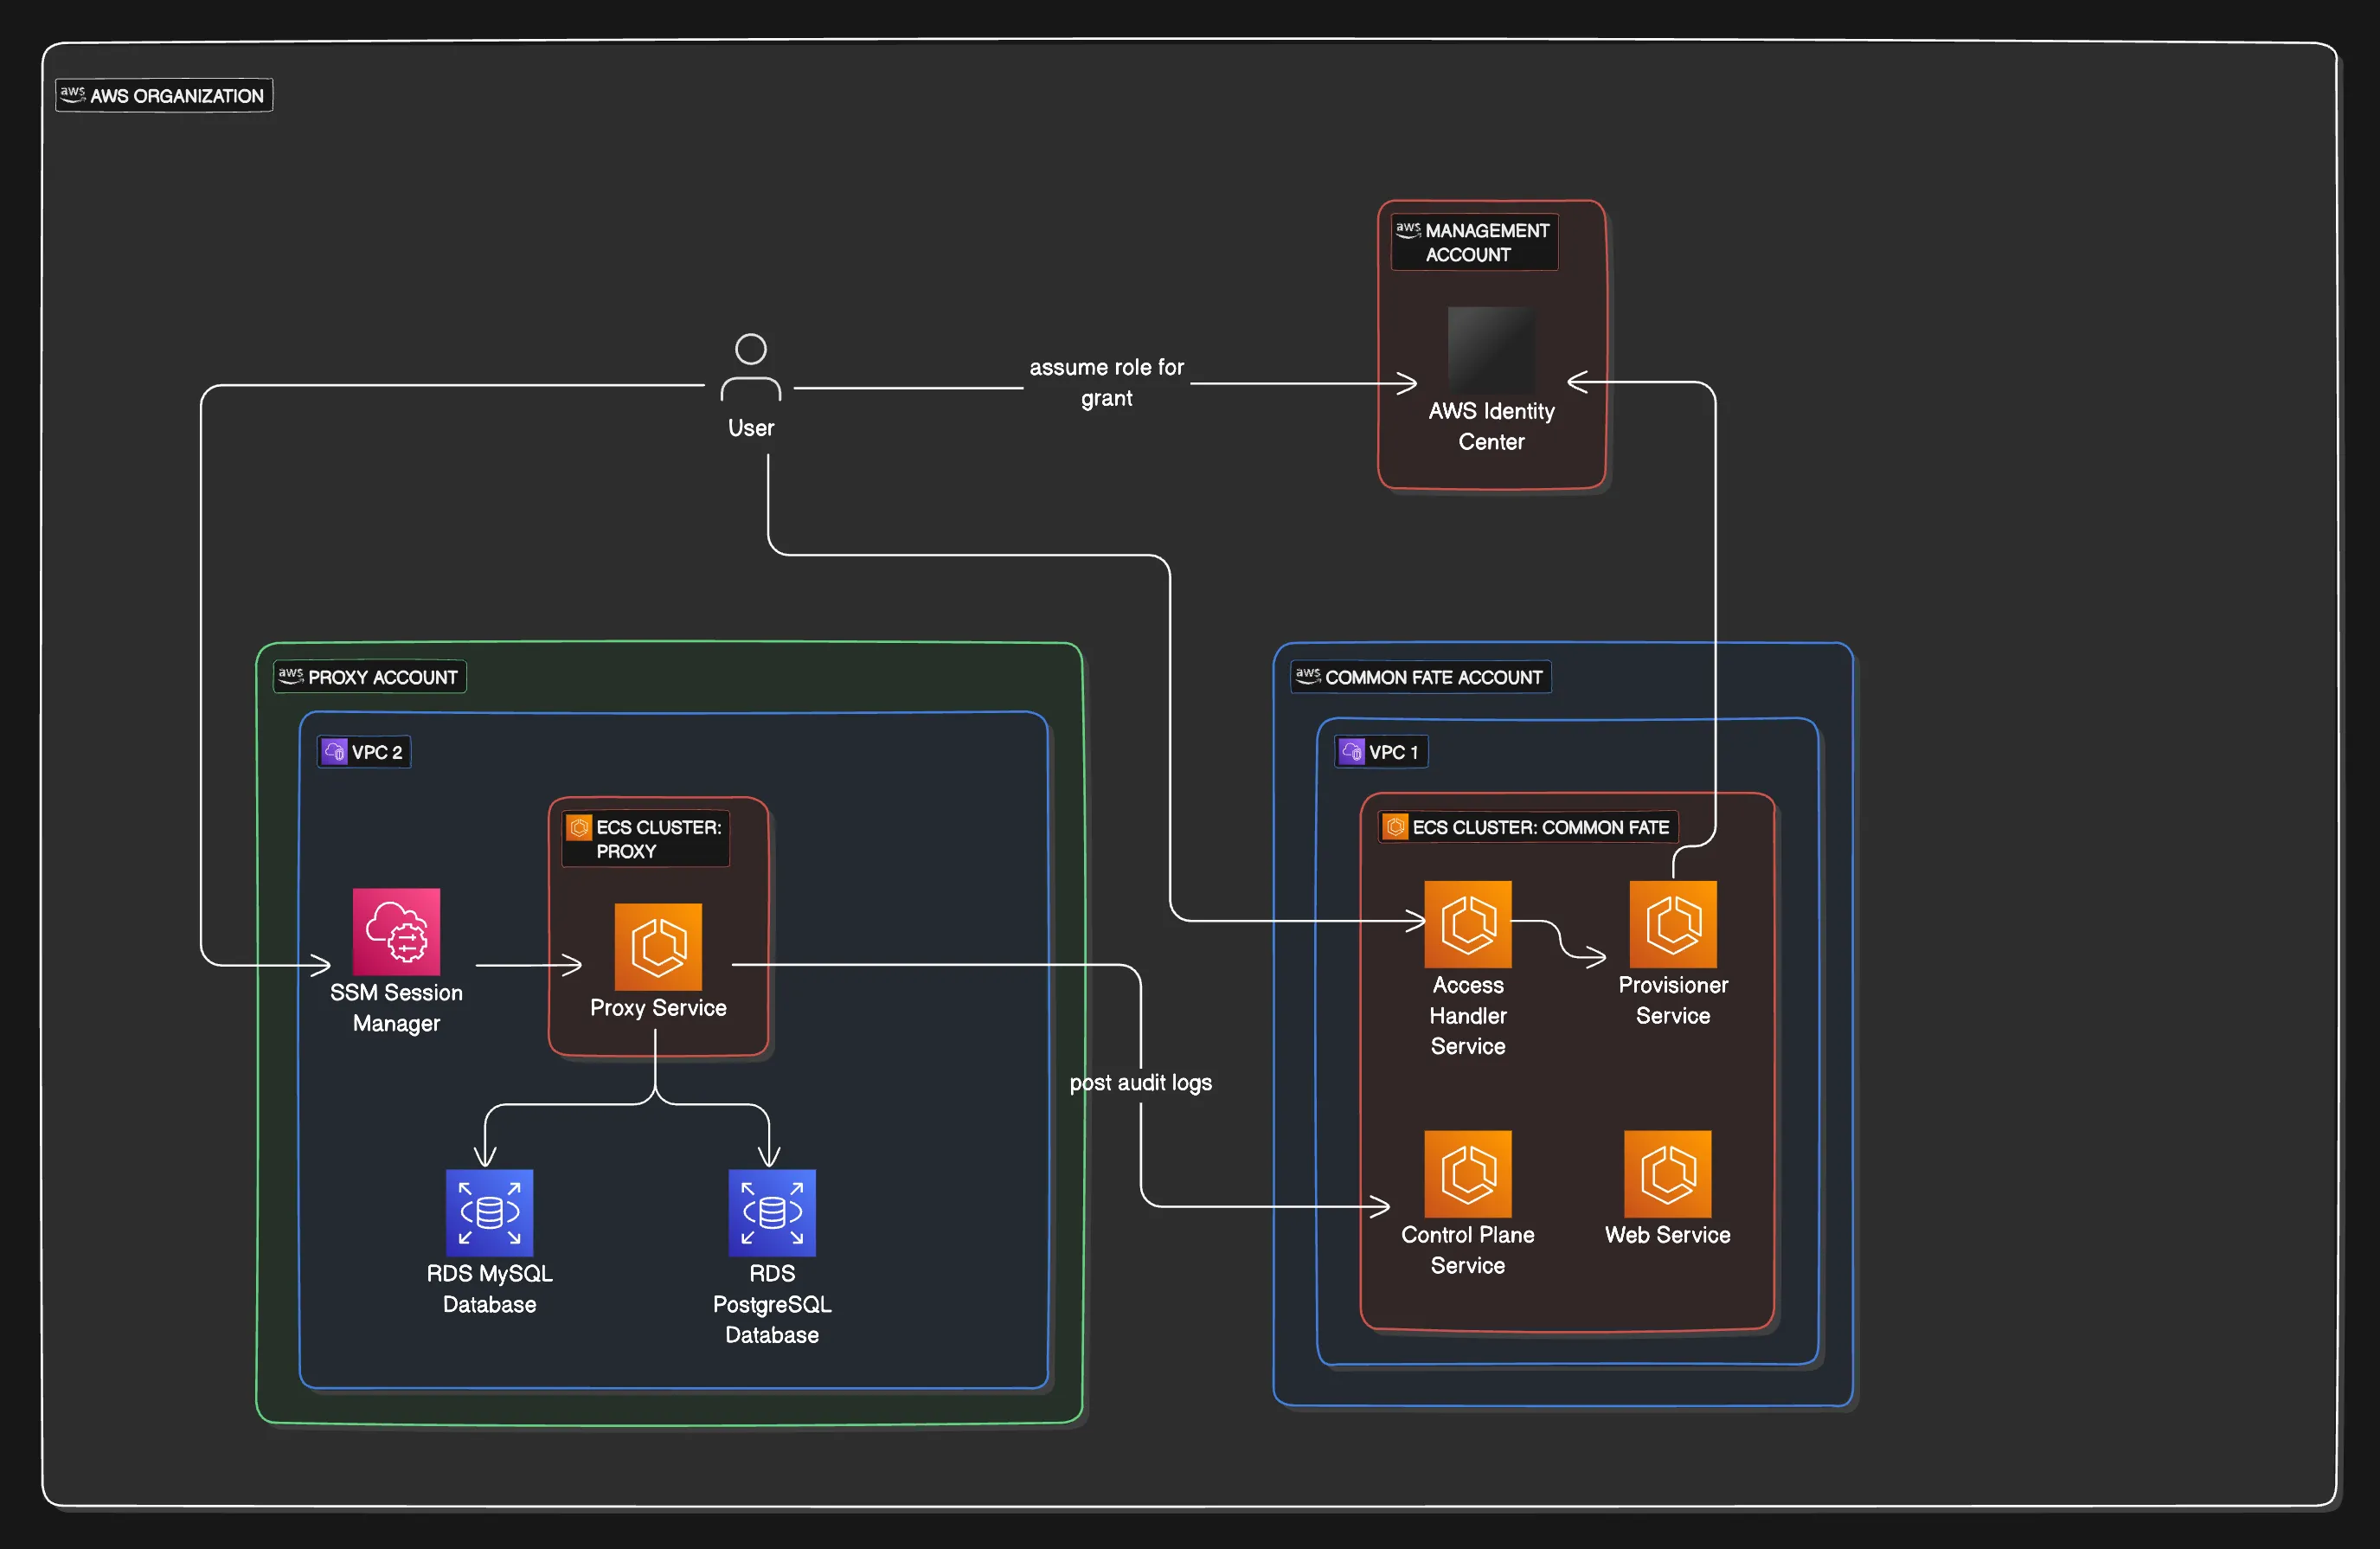
Common Fate’s AWS RDS integration allows your end users to request Just-In-Time (JIT) access to RDS databases, leveraging AWS SSM to connect via the Common Fate AWS Proxy service deployed to ECS in your account. The proxy service captures audit logs of all SQL commands executed by the user during their session which can be viewed in real-time.
This guide will walk you through integrating Common Fate with AWS RDS. By the end of this guide, you’ll have a functioning integration with Common Fate with Databases available for access.
Prerequisites
You’ll need to have set up the Common Fate AWS integration before adding AWS RDS. You’ll also need to be using the Common Fate Terraform Provider v2.22+.
The AWS RDS integration creates temporary Permission Sets in IAM Identity Center allowing users to connect over AWS SSM Session Manager. In order to provision these Permission Sets, the Common Fate AWS integration IAM roles need some additional permissions.
To add these permissions using our Terraform module, ensure that the permit_provision_permission_sets variable is set to true in the Terraform module:
module "common-fate-aws-roles" { source = "common-fate/common-fate-deployment/aws//modules/aws-idc-integration/iam-roles" version = "2.0.0" common_fate_aws_account_id = "123456789012" assume_role_external_id = "your-external-id" permit_provision_permission_sets = true}AWS RDS Overview
When a user requests access to a database in Common Fate, the provisioner creates a Permission Set in IAM Identity Center with the name set to the grant ID. This Permission Set is assigned to the user and the Account containing the Proxy. The Permission Set grants the user access to connect to the proxy using SSM StartSession for the AWS-StartPortForwardingSession document only.
The user then uses the Granted CLI granted rds proxy to begin port-forwarding the database to their local machine.
Audit Logging Queries
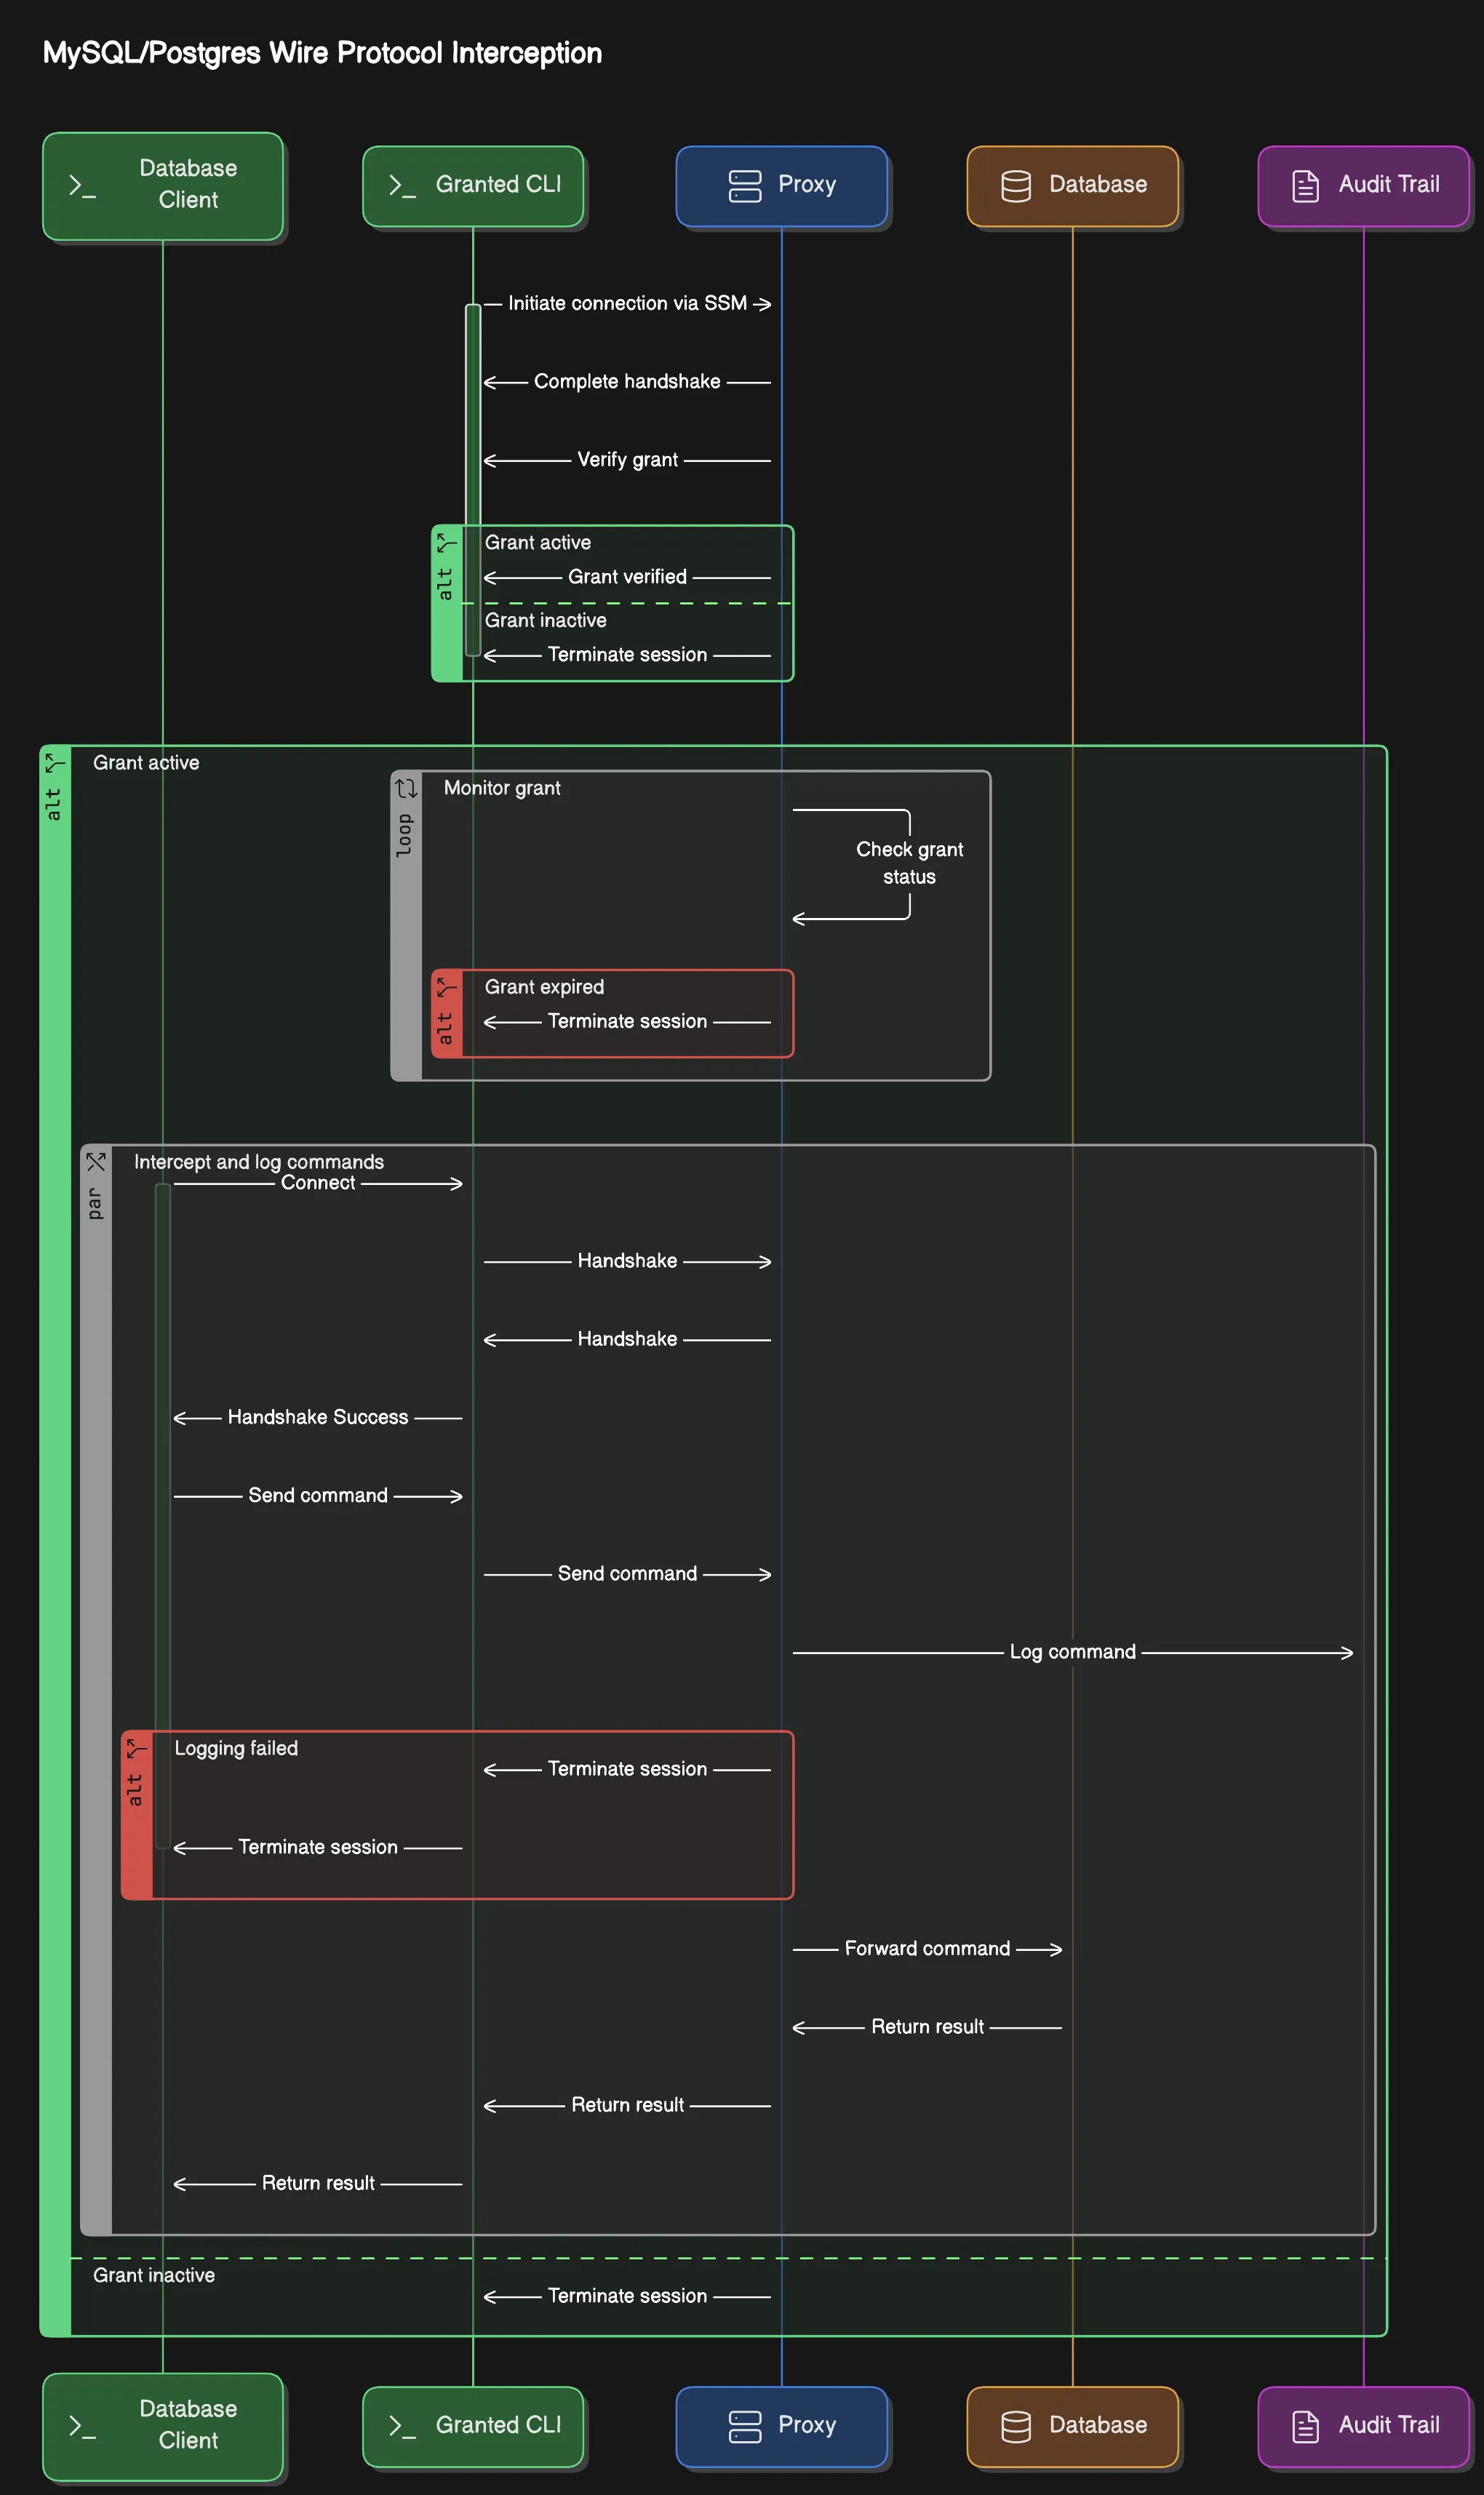
The Common Fate RDS Proxy handles MySQL and Postgres connections at the wire protocol level. The proxy acts as a database server to the database client, and forwards commands to the target database after logging the queries to the session logs in Common Fate for the Grant.
Deploying the Proxy
The proxy module is deployed into the account containing the target RDS instances.
To deploy and register the proxy with Common Fate use our commmon-fate-proxy-ecs module which will handle deploying the ECS task and networking. Below is an example using the module.
To expose a database to Common Fate, you will need to register them with our proxy-resource-aws-rds Terraform module. Some examples have been provided below for configuring a mysql and postgres database. The username field should match a user that exists in the database, you can consider creating a read only user in your database to limit the actions that can be taken while connected to the database.
  terraform {    required_providers {      commonfate = {        source  = "common-fate/commonfate"        version = "~> 2.25"      }      aws = {        source  = "hashicorp/aws"        version = "~> 5.0"      }    }  }
  provider "commonfate" {    api_url            = "https://commonfate.example.com" // Your Common Fate App url    oidc_client_id     = "<Your Provisioner OIDC client ID>"    oidc_client_secret = "<Your Provisioner OIDC client secret>"    oidc_issuer        = "<Your OIDC issuer>"  }

 module "proxy" {  source                     =  "common-fate/common-fate-proxy-ecs/aws"  id                         = "<choose an id>"  common_fate_aws_account_id = "12345678912" // the account where Common Fate is deployed  subnet_ids                 = [] // the proxy must be on a subnet with outbound internet access for AWS SSM to connect  vpc_id                     = "" // the VPC to deploy into  ecs_cluster_id             = "" // the ECS Cluster to deploy into  ecs_cluster_name           = "" // the ECS Cluster name  auth_issuer                = module.common-fate-deployment.outputs.auth_issuer // fetch this from your Common Fate deployment
  proxy_service_client_id    = "<Your Provisioner OIDC client ID>"  proxy_service_client_secret= "<Your Provisioner OIDC client secret>"
  app_url = "https://commonfate.example.com" // Your Common Fate App url
}

module "database" {  source                  = "common-fate/proxy-resource-aws-rds/commonfate"  proxy_id                = module.proxy.proxy_id  rds_instance_identifier = "example"  name                    = "Prod Postgres Database"  app_url                 = "https://commonfate.example.com" // Your Common Fate App url  database                = "postgres" // The name of the database on the RDS instance  rds_security_group_id   = "sg-12345678912" // database security group id  region                  = "us-west-2"
  users = [{     name                         = "Root"     username                     = "postgres"     password_secrets_manager_arn = "<The ARN of the Secrets Manager secret for this database user>"  }] }
The common-fate/proxy-resource-aws-rds/commonfate module creates the necessary IAM policies to allow the proxy service to read the database secrets from Secrets Manager. This module also creates a security group rule allowing the proxy to access the database.
The AWS Secrets Manager secret value referenced by password_secrets_manager_arn must be a key/value pair containing a password key. For example, the following secret in JSON format is valid:
{ "username": "postgres", "password": "postgrespassword" }Secrets managed by AWS RDS follow this format automatically.
Endpoint overrides
Common Fate will use the default endpoint pulled using the aws_db_instance data source.
Sometimes it may be necessary to connect using a different endpoint than the default configured in the database module above. To solve this the database users configuration has an optional endpoint field which can be used to override the endpoint specified in the module.
This can be used to strictly specify reader and writer endpoints for Aurora RDS instances.
module "database" {  source                  = "common-fate/proxy-resource-aws-rds/commonfate"  proxy_id                = module.proxy.proxy_id  rds_instance_identifier = "example"  name                    = "Prod Postgres Database"  app_url                 = "https://commonfate.example.com" // Your Common Fate App url  database                = "postgres" // The name of the database on the RDS instance  rds_security_group_id   = "sg-12345678912" // database security group id  region                  = "us-west-2"
  users = [{     name                         = "Root"     username                     = "postgres"     password_secrets_manager_arn = "<The ARN of the Secrets Manager secret for this database user>"     endpoint = "custom-aurora-endpoint-test.cluster.ap-southeast-2.rds.amazonaws.com"  }] }
Configuring Common Fate
In this section, you will add selectors and availabilities so that users can request access to the databases. You’ll need to have set up the Common Fate Application Configuration repository using our Terraform provider.
You can create an access workflow, or use an existing one.
resource "commonfate_access_workflow" "rds" { name = "RDS" access_duration_seconds = 60 priority = 1}Now create a commonfate_aws_rds_database_availability. This resources make a single database and user available to request:
resource "commonfate_aws_rds_database_availability" "postgres_root" { workflow_id = commonfate_access_workflow.rds.id // you can find the database id in the Common Fate console on the resources page aws_rds_database_id = "arn:aws:rds:us-west-2:12345678912:db:example/postgres" // you can find the user id in the Common Fate console on the resources page or in the children tab of the database resource aws_rds_database_user_id = "postgres@arn:aws:rds:us-west-2:12345678912:db:example/postgres" aws_identity_store_id = local.identity_store_id}Connecting to a Database
Users connect to a database using Granted CLI.
Select a database
❯ granted rds proxySelect a database to connect toDatabase Role
> Demo MySQL Database Root
    Demo Postgres Database                  Read Only    Demo Postgres Database                  Root
Connect your database client
The CLI will provide the connection information, these are stable between grants for the same database and role.
[i] Database proxy ready for connections on 127.0.0.1:5432
[i] You can connect now using this connection string: postgresql://read_only:password@127.0.0.1:5432/postgres?sslmode=disable
[i] Or using the postgres cli: psql "postgresql://read_only:password@127.0.0.1:5432/postgres?sslmode=disable"
Updating the Proxy
When you update your Proxy deployment in ECS, a container restart may be required. In this case, all active connections to the database will be terminated.