Profile Registries
Sharing consistent AWS profiles amongst team members can be helpful. This allows you to adopt consistent role names across your documentation and scripts. For example: ”run your development deploys using the cf-dev role”.
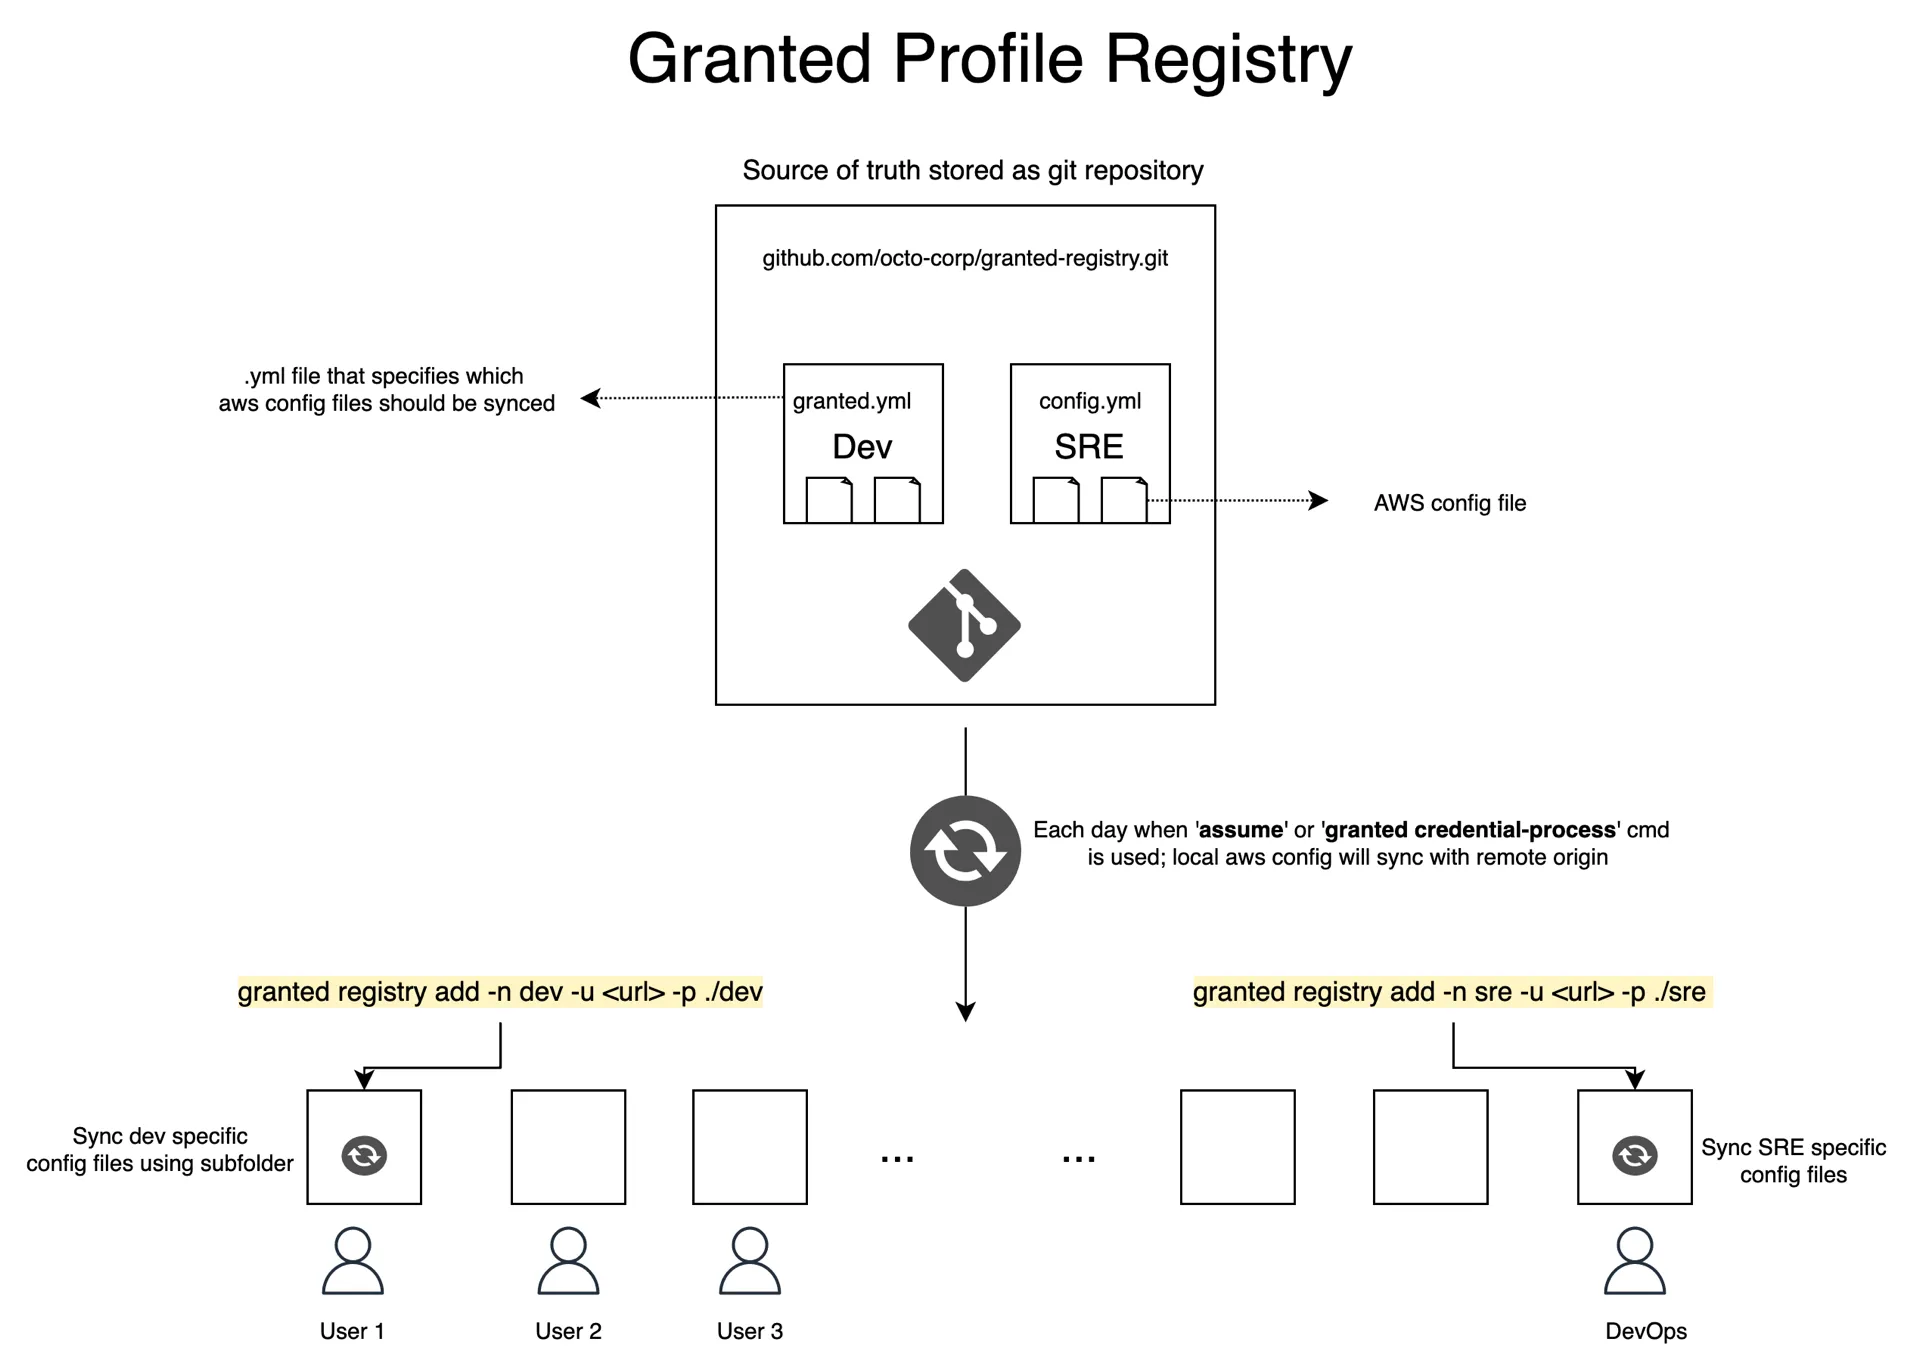
To manage sharing profile configuration, Granted provides a Profile Registry. This feature utilizes a git repository as a central store for AWS profile configurations. Granted’s Profile Registry synchronizes this to the default AWS config file located locally at ~/.aws/config.
Github Registry
Creating a Profile Registry
Using Granted to configure a Profile Registry
Create a Profile Registry folder.
You can quickly copy the contents of your local ~/.aws/config file to a Profile Registry repository with the following command:
granted registry setupThis command outputs a granted-registry folder to your current working directory. This folder contains the following files:
├── .git├── config└── granted.ymlAdd the local repository to your git-based version control tool.
The granted-registry repository will need to be manually added to your organization’s version control tool. For GitHub, you can follow this link.
Adding a Profile Registry
You can add any git-based repository to Granted’s Profile Registry. By default, Granted looks for a granted.yml file in the root of the repository. Should you wish to specify an alternative YAML file, follow this guide.
You can add a repository to Granted’s Profile Registry by running the following command:
granted registry add -name <registry_name> -url <repository_url>Here, flag -name or its alias -n is required to identify the registry.
The granted.yml file identifies AWS config files to be synced to Granted’s Profile Registry. These config files must exist in the repository; paths pointing outside the repository such as ../config are not permitted. Multiple config files are allowed and are merged together when syncing your local config file to the repository.
A valid granted.yml requires an awsConfig key to be present. For example:
awsConfig: - ./config - ./other-configIn the above example, AWS profiles inside config and other-config files will be merged and synced to your local ./aws/config file.
Adding a registry will manipulate your local ~/.aws/config file to include Granted autogenerated sections. Here’s an example:
# Granted-Registry Autogenerated Section. DO NOT EDIT.# This section is automatically generated by Granted (https://granted.dev). Manual edits to this section will be overwritten.# To edit, clone your profile registry repo, edit granted.yml, and push your changes. You may need to make a pull request depending on the repository settings.# To stop syncing and remove this section, run 'granted registry remove[granted_registry_start granted-registry]
[profile dev]sso_start_url  = <https://example.awsapps.com/start>sso_region     = <your-sso-region>sso_account_id = <your-sso-account-id>sso_role_name  = <your-sso-role-name>
[granted_registry_end granted-registry]Optional flags when adding a Profile Registry
| Optional Flag | Alias | Description |
|---|---|---|
| path | p | provide path if only the subfolder needs to be synced |
| file-name | f | provide filename if yml file is not granted.yml |
| priority | profile registry will be sorted by priority descending | |
| prefix-all-profiles | pap | provide this flag if you want to append registry name to all profiles |
| prefix-duplicate-profiles | pdp | provide this flag if you want to append registry name to duplicate profiles |
| required-key | r | used to bypass the prompt or override user specific values |
Usage:
Specifying an alternative YAML file.
Granted allows you to specify an alternative YAML file for your Profile Registry’s configuration. Should you wish to specify a different YAML file, run:
granted registry add -n <registry_name> -u <your-repo-url> -f <file_name>Specifying only a subfolder
If you have subfolder such as:
.├── team_dev│ ├── config1│ ├── config2│ ├── granted.yml│├── team_ops│ ├── config3│ ├── config4│ ├── custom.ymlThen you can specify only the subfolder containing a granted.yml file:
granted registry add -n <name> -u <your-repo-url> -p <relative_path_to_subfolder>Or with custom file name as:
granted registry add -n <name> -u <your-repo-url.git> -p <relative_path_to_subfolder> -f <filename>Handling duplicate profile names
When multiple registries are in use, registries are synced in descending priority where the default priority is zero. This allows you to consistently define which registry config should be prefixed upon duplication.
For example, you have Profile Registries core with priority one and devOps with priority zero that both include a profile named dev. In this case, the dev profile from devOps Profile Registry will be prefixed with the registry name to devops.dev.
Variable substitution for profile configurations
To enable templated profiles, profile values can include Go Templates. This is achieved through adding templateValues to your config.yml file. Below in an example.
awsConfig: - ./dev/config1templateValues: - <YourKeyName> - ... - BaseProfile: - value: "my-profile" - SessionName: - isRequired: true - prompt: "Enter your user name (e.g john.doe)"Templated values should be defined with {{ .Required.KeyName}} or {{ .Variables.KeyName}} to differentiate if they are user specific values or arbitrary variables.
Your corresponding profiles might look like:
[profile dev]sso_start_url  = <https://example.awsapps.com/start>sso_region     = <your-sso-region>sso_account_id = <your-sso-account-id>sso_role_name  = <your-sso-role-name>credential_process = granted credential-process --profile {{ .Profile }}
[profile prod]session_name = {{ .Required.SessionName }}role_arn = arn:aws:iam::0123456789012:role/example
[profile uat]source_profile = {{ .Variables.BaseProfile}}role_arn = arn:aws:iam::0123456789012:role/exampleUser specific values
Should your Profile Registry require user specific values, you can set these values as required fields by adding isRequired:true to the key name of the field. Below is an example granted.yml file.
awsConfig: - ...templateValues: - SessionName: - isRequired: true - prompt: "Enter your user name (e.g john.doe)"Your config file might look like:
[profile prod]session_name = {{ .Required.SessionName }}role_arn = arn:aws:iam::123456789012:role/exampleThe inclusion of isRequired:true will prompt the user to add the value for SessionName when the granted registry add/sync command is run. Upon successful execution, Granted will interpolate the template to the AWS config file with the user provided value.
Arbitrary variables
For cases where you want to reuse a variable within a config file, you can add value to any key name in templateValues. Below is an example granted.yml file:
- Add your template variable to granted.yml file like:
awsConfig: - ...templateValues: - BaseProfile: - value: "my-profile"Your config file might look like:
[profile myacc]source_profile = {{ .Variables.BaseProfile }}role_arn = arn:aws:iam::0123456789012:role/readonlySyncing a Profile Registry
Adding a Profile Registry is sufficient to sync the granted.yml config file. Once per day Granted will automatically sync the repositories contained within your Profile Registry. By default, this process will be invoked when you run granted credential-process or assume commands.
Should you wish to invoke a manual sync, run:
granted registry syncThis will loop over the repositories associated with your Profile Registry and will pull the latest changes from the remote origin, performing a sync operation.
Removing a Profile Registry
To unsubscribe a repository from Granted’s Profile Registry run the following command:
granted registry removeThis will display all repositories subscribed to Granted’s Profile Registry and will prompt you to choose a repository to unsubscribe.
Migrating Profile Registry configuration
As part of Granted v0.5.0, the Profile Registry didn’t require the -n or -u flags. Granted v0.6.0 includes breaking changes to this. If you are using a version of Profile Registries prior to Granted v0.6.0, run the following command to migrate your registry configuration:
granted registry migrateHTTP registry
Granted version v0.26.0+ includes support for specifying a HTTP registry. This can either be connected with a Common Fate deployment or by creating your own HTTP based registry by implementing the granted.registry.aws.v1alpha1 Connect RPC API.
Granted uses OIDC to authenticate to the HTTP registry. The ~/.cf/config file is used to configure the OIDC provider. Here’s an example configuration, using Cognito as the OIDC provider.
current_context = "default"
[context]  [context.default]    oidc_issuer = "https://cognito-idp.ap-southeast-2.amazonaws.com/ap-southeast-2_xzhfVdcnp"    oidc_client_id = "169vrs7th13n3rj1pvqiic3cxA"
To log in to the OIDC provider, you can run granted auth login.
Common Fate built-in Profile Registry
Granted connects with Common Fate to automatically sync available AWS profiles into your ~/.aws/config file.
- Create your Common Fate configuration by running
granted auth configure <cf_deployment_url>. This will set the necessary config in your cf config
granted auth configure https://commonfate.example.com # replace this with your deployment URL- Next authenticate yourself with the deployment by running
granted auth login.
granted auth login- Add the profile registry:
granted registry add --name common-fate --type http --url https://commonfate.example.com # replace this with your deployment URL