Getting Started
Install the AWS CLI
Although Granted doesn’t depend on the AWS CLI, we recommend installing it in order to run a test command to verify Granted is working properly.
Video Walkthrough
If you’d prefer to watch a video tutorial, Rowan from Common Fate has recorded an introduction to Granted on our Youtube channel.
Set up your AWS profile file
You will also need to set up at least one role in your AWS config file. On MacOS and Linux, this is stored in ~/.aws/config. On Windows, this is stored in the %UserProfile% directory. Some example configurations are included below.
If you use AWS SSO but you haven’t yet configured any profiles, you can run aws configure sso which will walk you through the process of setting up your profile file.
If you’ve already set up roles for the AWS CLI to access AWS you probably don’t need to configure anything: Granted uses the same configuration files as the AWS CLI.
# Change the values below to match your AWS SSO configuration# Granted uses the profile name: in this case 'my-profile' to choose the role.
[profile my-profile]sso_start_url=https://mycompany.awsapps.com/startsso_region=us-east-1sso_account_id=123456789012sso_role_name=DeveloperRoleregion=us-east-1
More information on using IAM users and roles can be found here.
[base]aws_access_key_id=<ACCESS_KEY>aws_secret_access_key=<SECRET_KEY># Change the values below to match your AWS role configuration# Granted uses the profile name: in this case 'my-profile' to choose the role.
[profile base]region=us-east-1
[profile my-profile]region=us-east-1source_profile=baserole_arn=arn:aws:iam::123456789012:role/my-roleInstalling the CLI
In order to use Granted you’ll need to install it on your system. Common Fate provides binaries for Granted.
Using Homebrew
Homebrew is an open source package manager for MacOS. We publish a Homebrew formula for Granted. To install Granted with Homebrew, run the commands below in your terminal.
brew tap common-fate/grantedbrew install common-fate/granted/grantedManual install
Select the steps which match your system architecture. You can find your architecture by running uname -m from a terminal window.
For Intel (x86_64 architecture):
curl -OL https://releases.commonfate.io/granted/v0.36.2/granted_0.36.2_darwin_x86_64.tar.gzsudo tar -zxvf ./granted_0.36.2_darwin_x86_64.tar.gz -C /usr/local/bin/ln -s /usr/local/bin/granted /usr/local/bin/assumegoFor ARM (arm64 architecture):
curl -OL https://releases.commonfate.io/granted/v0.36.2/granted_0.36.2_darwin_arm64.tar.gzsudo tar -zxvf ./granted_0.36.2_darwin_arm64.tar.gz -C /usr/local/bin/ln -s /usr/local/bin/granted /usr/local/bin/assumegoReverting to an older version of Granted
If you need to revert to an older version of Granted, you can manually downgrade using the following steps. First, make sure to uninstall your current version of granted. Replace “0.36.2” with the specific version you want to install.
Using Homebrew
brew uninstall grantedbrew tap-new $USER/local-tapbrew extract --version=0.36.2 common-fate/granted/granted $USER/local-tapbrew install granted@0.36.2For Intel (x86_64 architecture):
curl -OL https://releases.commonfate.io/granted/v0.36.2/granted_0.36.2_darwin_x86_64.tar.gzsudo tar -zxvf ./granted_0.36.2_darwin_x86_64.tar.gz -C /usr/local/bin/ln -s /usr/local/bin/granted /usr/local/bin/assumegoFor ARM (arm64 architecture):
curl -OL https://releases.commonfate.io/granted/v0.36.2/granted_0.36.2_darwin_arm64.tar.gzsudo tar -zxvf ./granted_0.36.2_darwin_arm64.tar.gz -C /usr/local/bin/ln -s /usr/local/bin/granted /usr/local/bin/assumegoThe assumego path is symlinked to granted so that they can both share keychain items without additional prompts. The homebrew install does this automatically but for a manual install on MacOS you’ll need to do it yourself.
Download the latest Granted release using APT by following the steps below. Our Linux releases are signed with a separate GPG key to our binary files.
# install GPGsudo apt update && sudo apt install gpg
# download the Common Fate Linux GPG keywget -O- https://apt.releases.commonfate.io/gpg | sudo gpg --dearmor -o /usr/share/keyrings/common-fate-linux.gpg
# you can check the fingerprint of the key by running# gpg --no-default-keyring --keyring /usr/share/keyrings/common-fate-linux.gpg --fingerprint# the fingerprint of our Linux Releases key is 783A 4D1A 3057 4D2A BED0 49DD DE9D 631D 2D1D C944
# add the Common Fate APT repositoryecho "deb [arch=$(dpkg --print-architecture) signed-by=/usr/share/keyrings/common-fate-linux.gpg] https://apt.releases.commonfate.io stable main" | sudo tee /etc/apt/sources.list.d/common-fate.list
# update your repositoriessudo apt update
# install Grantedsudo apt install granted
Select the steps which match your system architecture. You can find your architecture by running uname -m from a terminal window.
curl -OL releases.commonfate.io/granted/v0.36.2/granted_0.36.2_linux_x86_64.tar.gzsudo tar -zxvf ./granted_0.36.2_linux_x86_64.tar.gz -C /usr/local/bin/curl -OL releases.commonfate.io/granted/v0.36.2/granted_0.36.2_linux_arm64.tar.gzsudo tar -zxvf ./granted_0.36.2_linux_arm64.tar.gz -C /usr/local/bin/curl -OL releases.commonfate.io/granted/v0.36.2/granted_0.36.2_linux_i386.tar.gzsudo tar -zxvf ./granted_0.36.2_linux_i386.tar.gz -C /usr/local/bin/First, download the zip archive of Granted which matches your system’s architecture. You can find your architecture by viewing your system properties in the Control Panel.
After downloading Granted, unzip the package. Granted runs as two binaries, assume and granted. Any other files in the package can be removed, and Granted will still function.
You’ll need to move Granted to a folder that is accessible on your PATH. This StackOverflow link has instructions on how to do this.
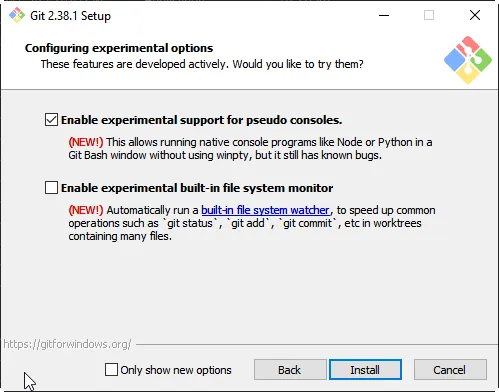
If you are using Granted with the Git Bash shell on Windows, we recommend enabling experimental support for pseudo consoles. You may need to reinstall Git For Windows to enable this. You can read more about this here.
Verify the installation
You can verify the integrity and authenticity of the Granted binary you have downloaded by running through the verification process here.
To verify that the installation has succeeded, print the version of Granted by running granted -v. You should see an output similar to below.
➜ granted -v
Granted v0.36.2
If you have any issues installing don’t hesitate to ask for help on our Slack.
Next steps
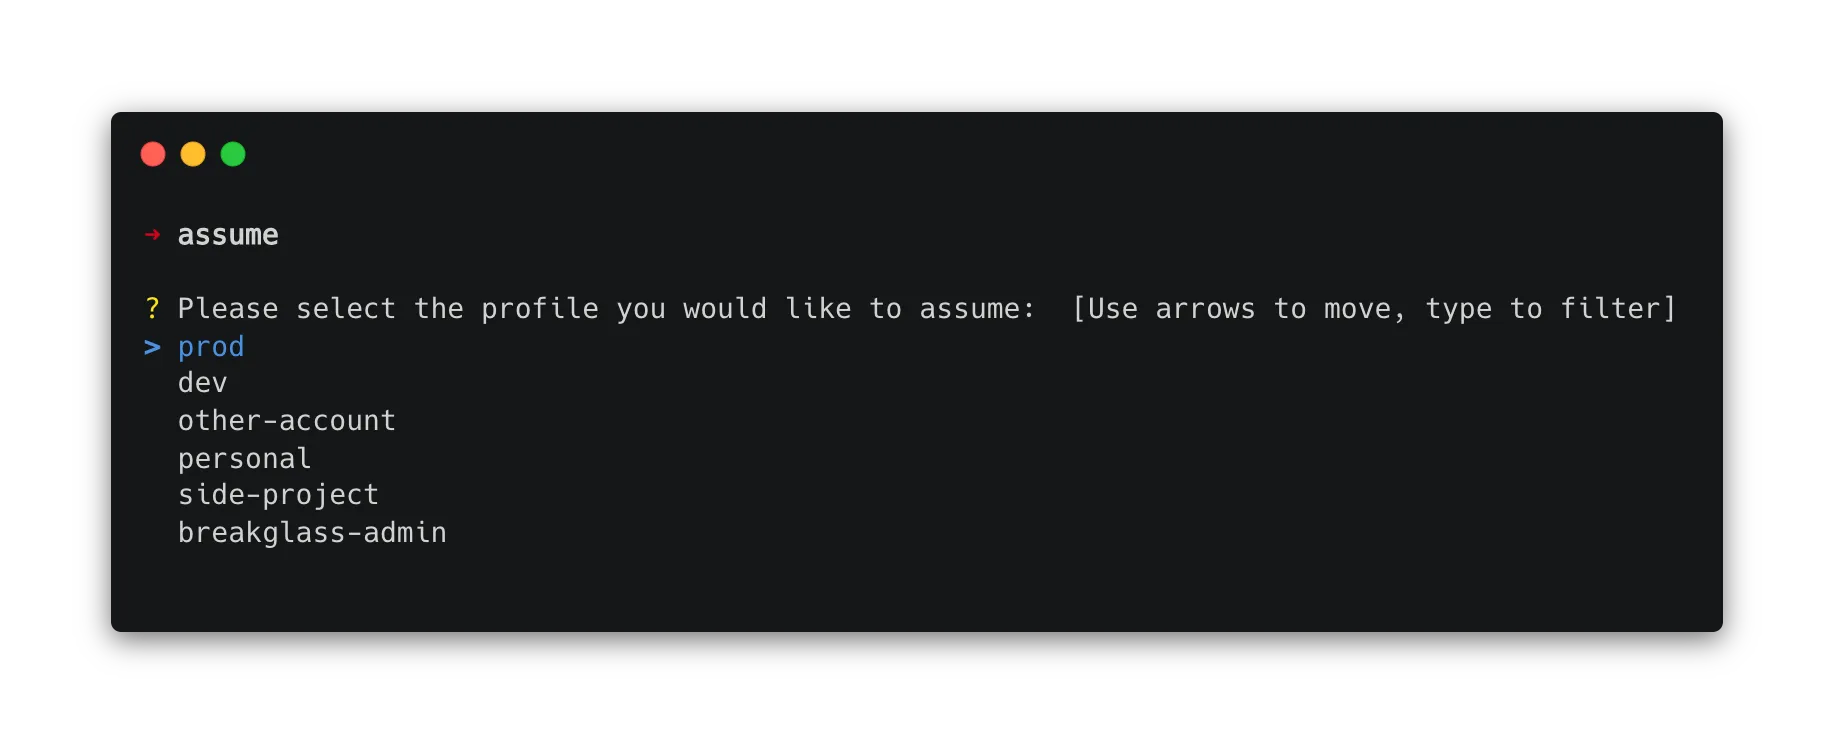
Now that you’ve installed Granted, it’s time to assume your first role.